Amazon Web Services
Amazon Web Services (AWS)
Amazon Web Services (AWS) is an extensive cloud computing platform with more than 100 Platform as a Service (PaaS), Infrastructure as a Service (IaaS) and Software as a Service (SaaS) offering. One of the most noteworthy AWS is CloudFront, an innovative content delivery network (CDN) with servers located in Europe, Asia, Africa, South America, Australia and the United States.
What is Amazon CloudFront?
Amazon CloudFront is an optimised web service with global spread and caching abilities which speed up the dispersal of content, such as .html, .CSS, .js, and image files, to the user. CloudFront delivers content through a worldwide network of data centres called edge locations. When a user requests the content served with CloudFront, the request will get routed to the lowest latency (time delay) edge location, which means that content is consistently delivered quickly and efficiently.
If the content is already in the edge location, it will reach the viewer immediately. Otherwise, CloudFront retrieves it from an origin such as an Amazon S3 bucket (public cloud storage), a web server, or a Media Package channel.

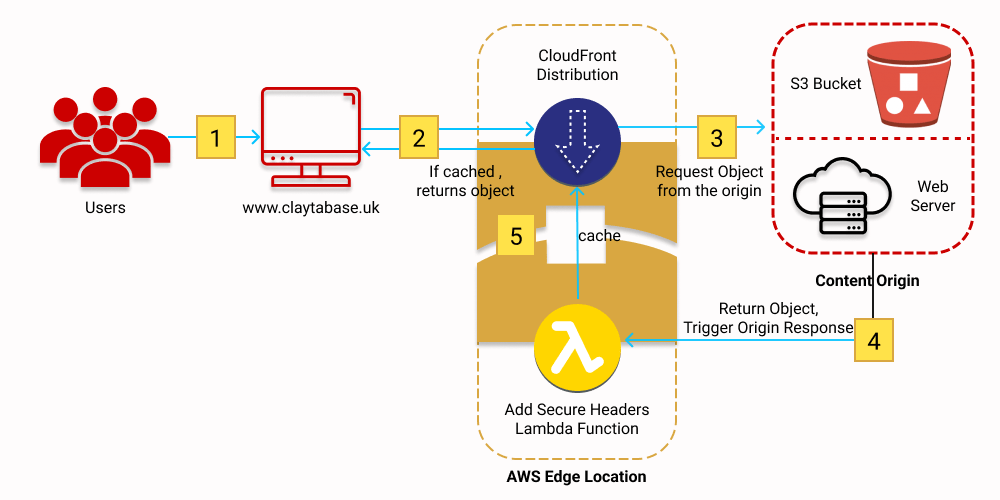
![]()
- The viewer requests the website at www.claytabase.co.uk.
- If the requested object is cached, CloudFront returns the object from its cache to the viewer.
- If the object is not in CloudFront’s cache, CloudFront requests the object from the origin (an S3 bucket).
- S3 returns the object to CloudFront, which triggers the Lambda@Edge origin response event.
- The object, including the security headers added by the Lambda@Edge function, is added to CloudFront’s cache.
- (Not shown) The objects are returned to the viewer. Subsequent requests for the object that come to the same CloudFront edge location are served from the CloudFront cache.
Setting up AWS CloudFront
As an innovative CDN, distributing content with CloudFront is a relatively straightforward process. The instructions in this section explain how to use CloudFront to set up a basic configuration that does the following:
- Stores the original versions of your objects in an Amazon Simple Storage Service (Amazon S3) bucket or your web server
- Makes your objects accessible to everyone
- Uses the CloudFront domain name in URLs for your objects (for example, http://d111111abcdef8.cloudfront.net/index.html)
- Keeps your objects in CloudFront edge locations for the default duration of 24 hours (the minimum duration is 0 seconds)
You will need to complete a few basic steps before CloudFront will deliver your content. The first step is to sign up to the service. After that, all you will need to do is create a CloudFront distribution which tells CloudFront where to deliver the content, before
using the CloudFront domain name URLs in your web pages or applications to reference the content.
Prerequisites
Login to your CloudFront account
Step 1: Upload your content to Amazon S3 and grant object permissions
To upload your content to Amazon S3 and grant read permissions to everyone
- Sign in to the AWS Management Console and open the Amazon S3 console at https://console.aws.amazon.com/s3/.
- Choose Create bucket.
- For Bucket name, enter a bucket name.
- For Region, choose an AWS Region for your bucket. We recommend that you choose a region close to you to optimise latency and minimise costs. Alternatively, you may decide to choose another region to address regulatory requirements.
- In the Block Public Access settings for bucket section, clear the check box for Block all public access.
- Leave all other settings at their defaults, and then choose Create bucket.
- In the Buckets section, choose your new bucket, and then choose Upload.
- Use the Upload page to add your content to the S3 bucket. If you downloaded the simple hello world webpage, add the index.html file and the CSS folder (with the style.css file inside it).
- Choose Additional upload options to expand the section.
- In the Access control list (ACL) section, select the check box for Read next to Everyone (public access) in the Objects column.
- Select the check box for I understand the effects of these changes on the specified objects.
- At the bottom of the page, choose Upload.
Step 2: Create a CloudFront distribution
To create a CloudFront distribution
- Open the CloudFront console at https://console.aws.amazon.com/cloudfront/v3/home.
- Choose Create Distribution, and then choose Get Started.
- Under Origin Settings, for Origin Domain Name, choose the Amazon S3 bucket you created earlier.
- For the other settings under Origin Settings, accept the default values.
- For the settings under Default Cache Behavior Settings, accept the default values. 6. For more information about cache behavior options, see Cache behavior settings.
- For the settings under Distribution Settings, accept the default values. 8. For more information about distribution options, see Distribution settings.
- At the bottom of the page, choose Create Distribution.
- After CloudFront creates your distribution, the value of the Status column for your distribution changes from In Progress to Deployed. This typically takes a few minutes.
Step 3: Access your content through CloudFront
To access the content through CloudFront, simply combine the CloudFront distribution domain name with the path to access your content. Traditionally, the path to access the main page of a website is /index.html. In this case, you could access your content through CloudFront at a URL that would look something like this:
https://d111111abcdef8.cloudfront.net/index.html
Congratulations! You have successfully configured CloudFront to serve content stored in Amazon S3 from your website. If you want to go a step further, you can configure your CloudFront distribution to use a custom domain name (for example, www.example.com instead of d111111abcdef8.cloudfront.net). For more information, see Using custom URLs.