Google Cloud Services
Google Cloud Platform (GCP)
Before we dive into the numerous benefits that the Google Cloud Platform can offer to both businesses and individuals, let’s start by exploring what we mean by cloud computing.
A brief introduction to cloud computing
Cloud computing is a broad term used to refer to resources and services that can be accessed on-demand within the online space. Cloud computing services can include database storage, applications, computing power, and an array of other IT resources which can be accessed on a pay-as-you-go basis via remote servers on the internet.
Importantly, there are three standard models used by cloud computing service providers:
- Platform as a Service (PaaS)
- Software as a Service (SaaS)
- Infrastructure as a Service (IaaS)
What is the Google Cloud Platform?
The Google Cloud Platform (GCP) is a comprehensive suite of cloud computing services provided by Google. This public cloud computing service has a wide variety of offerings which have been designed to meet the often-complex needs of businesses around the world.
Its services include computing, storage, networking, application development, Big Data, and hybrid cloud offerings. However, this short list really is only the tip of the iceberg when it comes to the numerous businesses benefits this platform can offer. Notably, Google Cloud runs on the same cloud infrastructure used internally by the search giant to serve many of its end-user products including Gmail, YouTube, Google Search, and Google Drive. So, it’s safe to say it’s good!
Google Cloud resources
Google Cloud consists of both physical assets, including hard drives and computers, and virtual resources such as virtual machines (VMs). These are all contained within Google’s regional data centres, which can be found in Asia, Australia, Europe, North America, and South America.
Each region is comprised of a collection of zones and every zone has a unique letter identifier. For example, zone ‘a’ in the East Asia region is referred to as ‘asia-east1-a’. This distribution of resources provides several benefits, including redundancy in case failures occur and reduced latency as resources are located closer to clients.
Accessing resources through cloud computing services
In cloud computing, all software and hardware products become services. In turn, these services provide access to the underlying resources, which are too numerous to list here. In fact, the already extensive list of available Google Cloud services continues to grow.
When we develop a website or an application on Google Cloud, we mix and match these services to create the robust infrastructure needed to support high quality builds. Only when this infrastructure is in place do we begin to add our unique code to enable the successful creation of a first-class digital solution.
The relationship between global, regional, and zonal resources
Global resources are those which can access services from all regions and zones across the globe. There are a variety of different global resources, including disk images, disk snapshots, and networks.
Regional resources have access to services within a specific region, and static external IP addresses are a prime example of this type of resource.
Zonal resources can only access services within the same zone. VM instances, their types, and disks are all good examples of zonal resources.
The following diagram shows the relationship between global, regional, and zonal resources:
-Image-
It is necessary to understand how the services can vary between regions and zones. Additionally, it is also important to recognise how different services can and cannot interact with each other. For example, creating a network must be viewed as a global operation because it needs to function on a global level.
Conversely, reserving an IP address is a regional operation because each IP address is a regional resource. Let’s look at another example here. Even if you could, you simply wouldn’t want to attach a disk in one region to a computer in another region. Why? Because the latency you would introduce would contribute to an overall poor performance.
Thankfully, Google Cloud prevents this from happening as disks can only be attached to computers in the same zone.
How to create a Google Cloud project
Step 1: Go to https://cloud.google.com/gcp and click on the 'Get started for free' button.
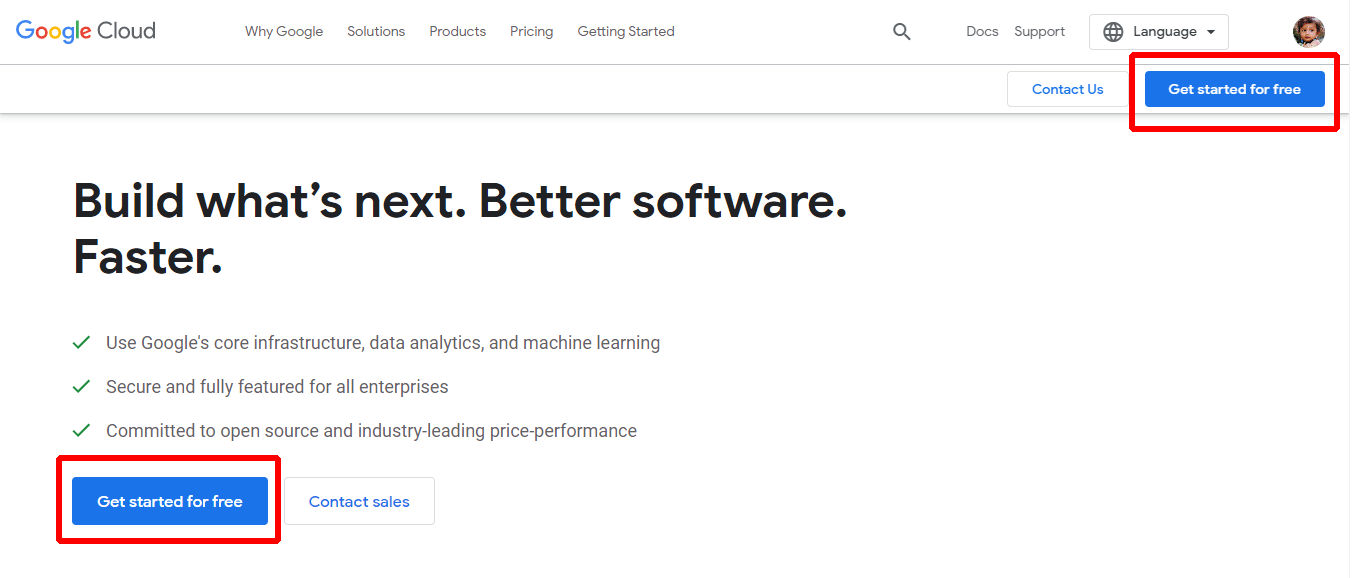
Step 2: If you already have a Google account, sign in with that. Alternatively, work through the steps to create a new account.
Step 3: Once logged in, you’ll need to take three more steps before you reach the Google Cloud Platform's landing page.
The first is to select your country, agree to all the Terms of Service, and click on the 'Continue' button.
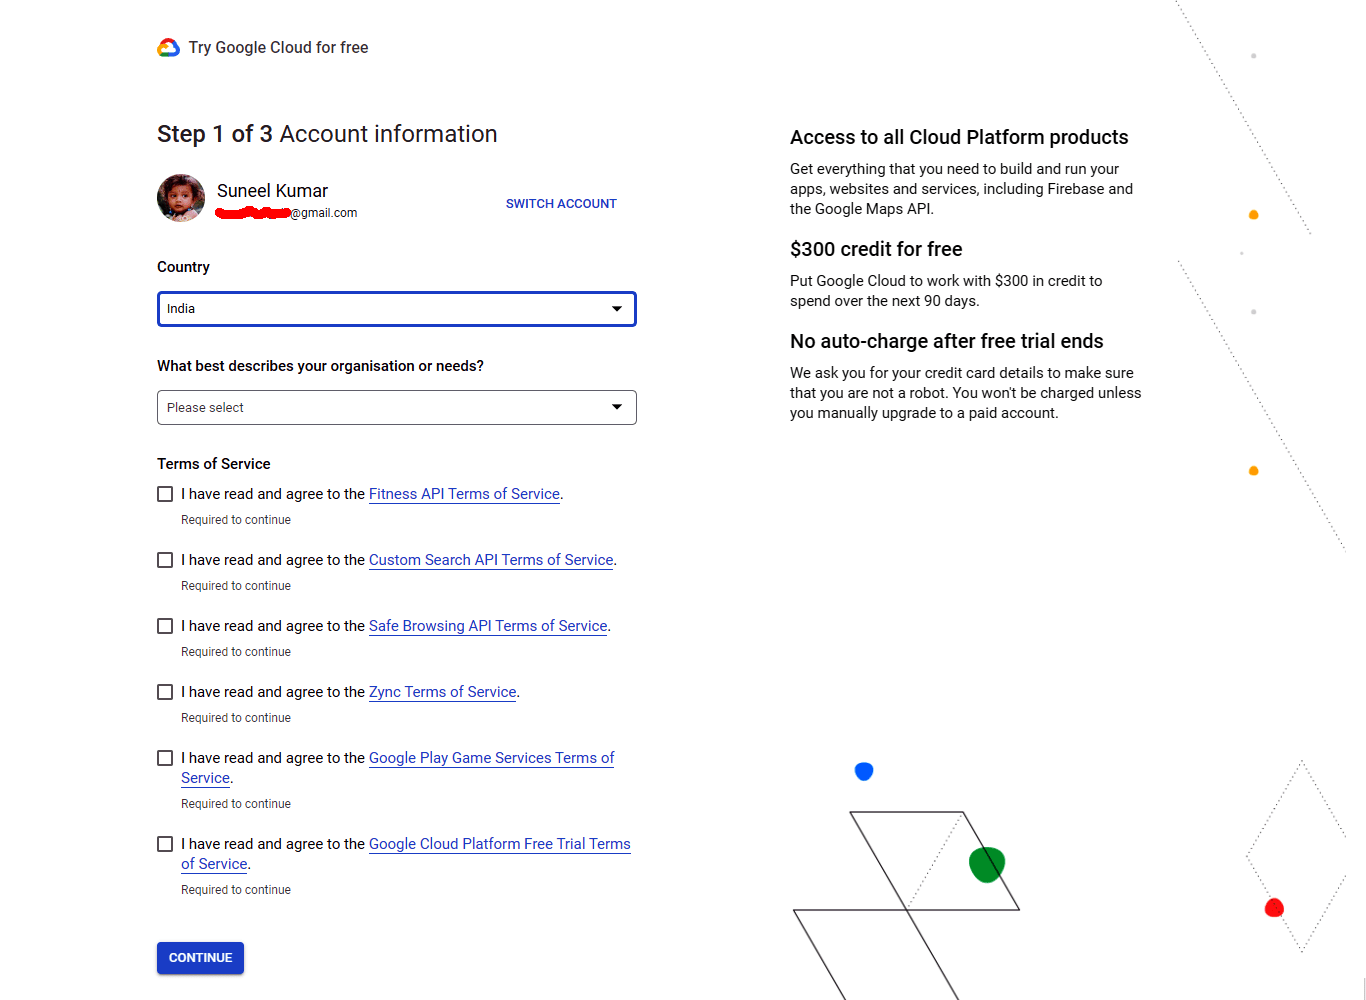
The second step involves verifying your identity and contact information. When you have done this, click on the ‘Continue’ button.

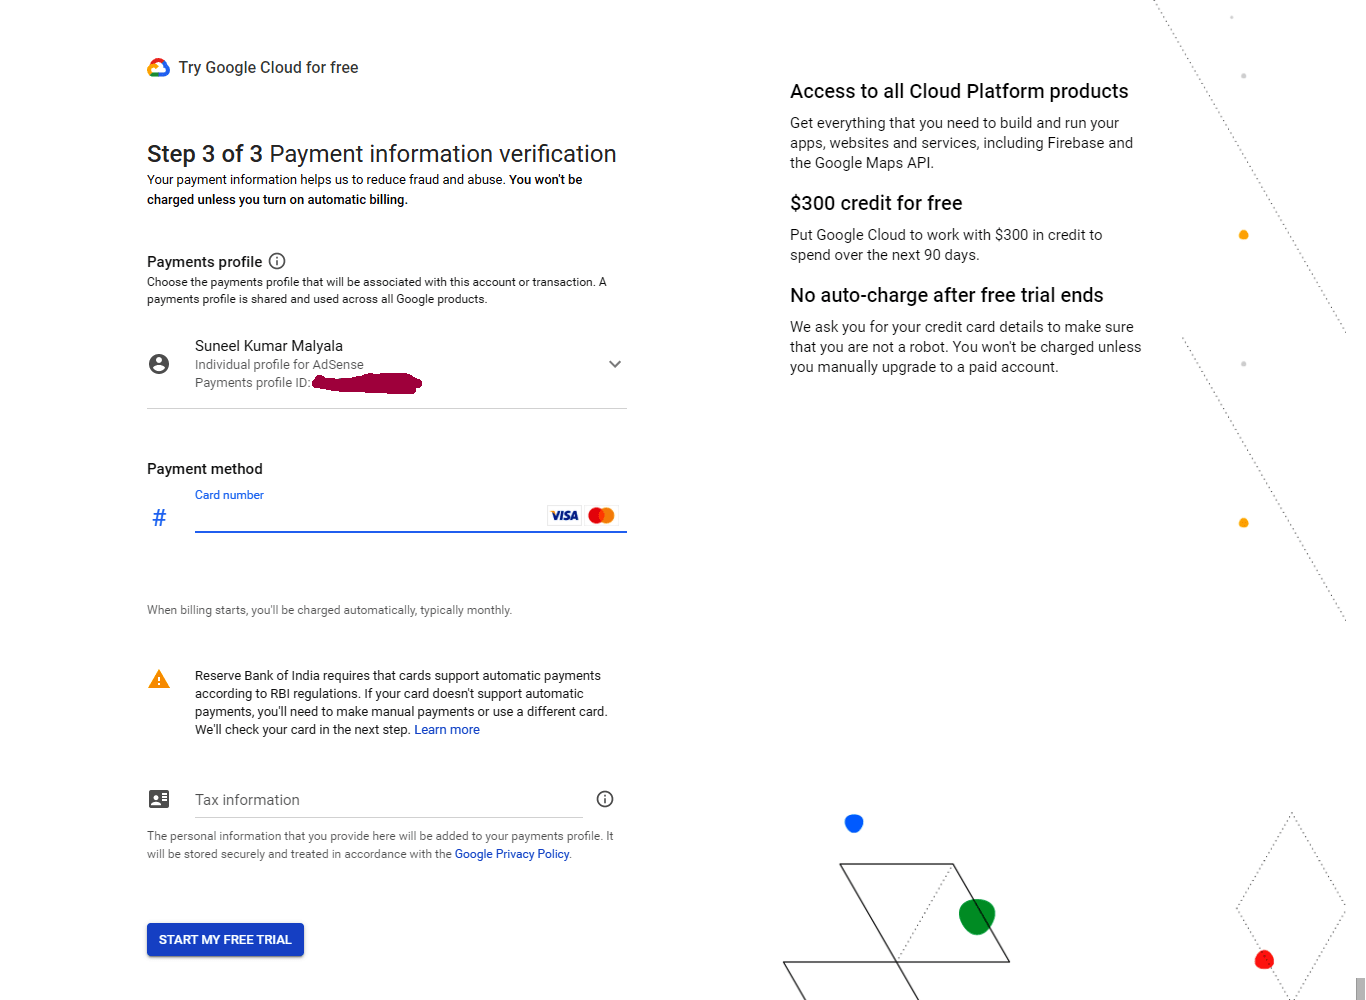
The third step is where payment information verification occurs. Payment information is required to reduce fraud and abuse; however, Google will not charge your account unless it is manually upgraded to a paid account.
Now, simply click on the ‘Start my free trial’ button to be taken directly to the Google Cloud Platform landing page.
Step 4: Once on the Google Cloud Platform landing page, click on the ‘Go to console’ button.
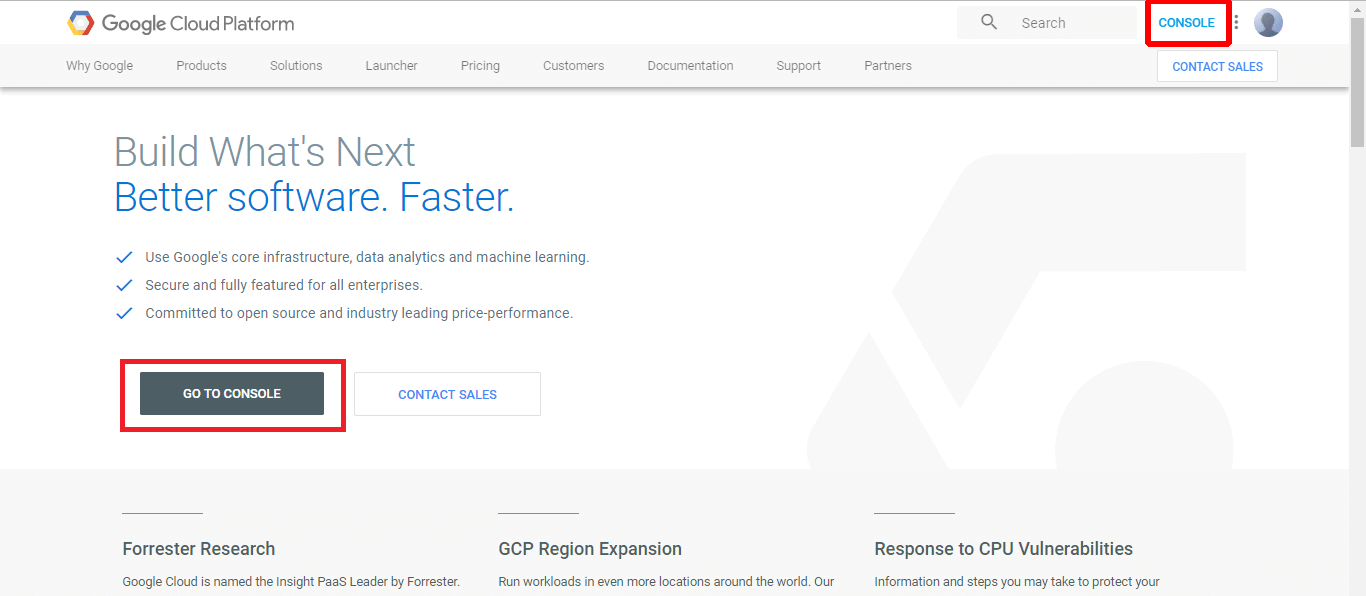
You will then be taken to the dashboard page with a default project selected, which includes a summary of GCP services, projects, and other insights.
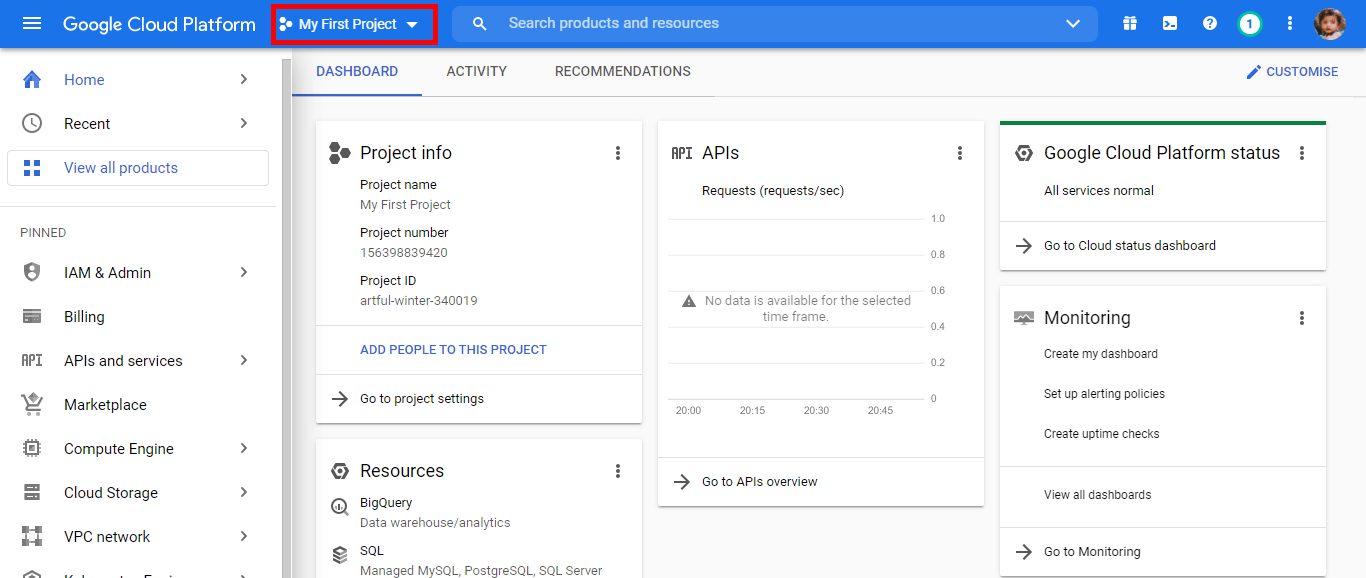
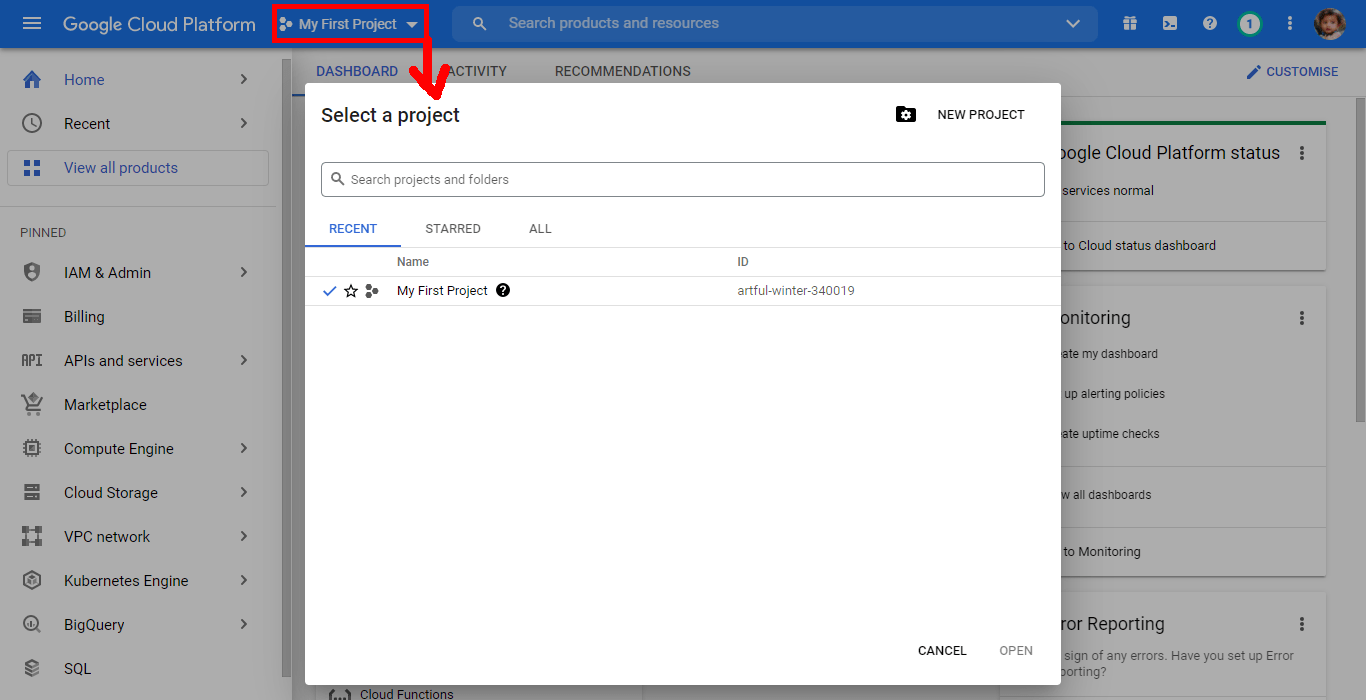
Step 5: On the dashboard page, click the ‘Select from’ button which can be found in the drop-down list at the top of the page. In the window that appears, select your project.
This will ensure the project ID, the project number, and the project name, is displayed on the Project info card.
But what do these terms mean?
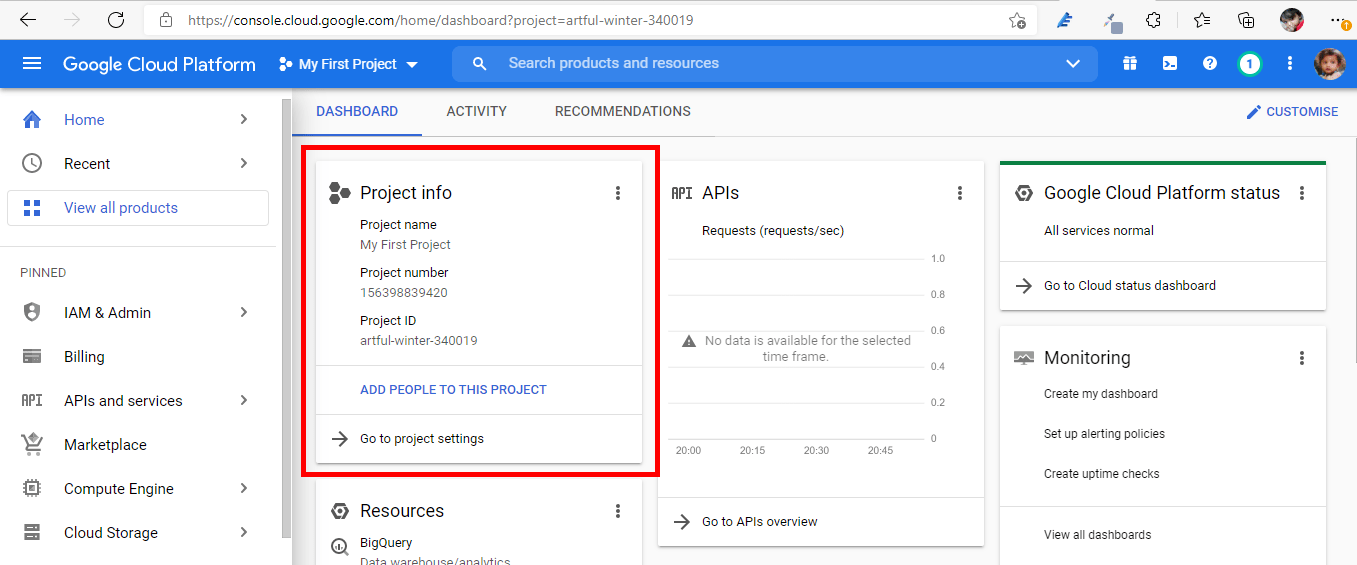
Every Google Cloud project is assigned a:
- Project Name
Project names are non-unique and human-readable, which can be edited at any point either during or after a project is created.
- Project ID
A project ID is a globally unique identifier used to differentiate each project in Google Cloud. The Cloud Console can generate a project ID, however it is also possible to create your own. Please note that it is only possible to modify the project ID when the project is being created.
If you choose to create your own project ID, there are several requirements to keep in mind:
- Must be 6 to 30 characters in length.
- Must only contain lowercase letters, numbers, and hyphens.
- Must begin with a letter.
- Cannot end with a hyphen.
- Must not have been used previously; this includes deleted projects.
- Cannot contain restricted strings, such as ‘google’ and ‘SSL.’
- Project Number
An automatically generated unique identifier for your project.
Remember, do not include sensitive information in your project name, ID, or in the naming of other resources.
Step 6: Now it's time to create a Virtual Machine (VM). For this, scroll down to the compute section in the left sidebar and click on the ‘Compute Engine’ option.
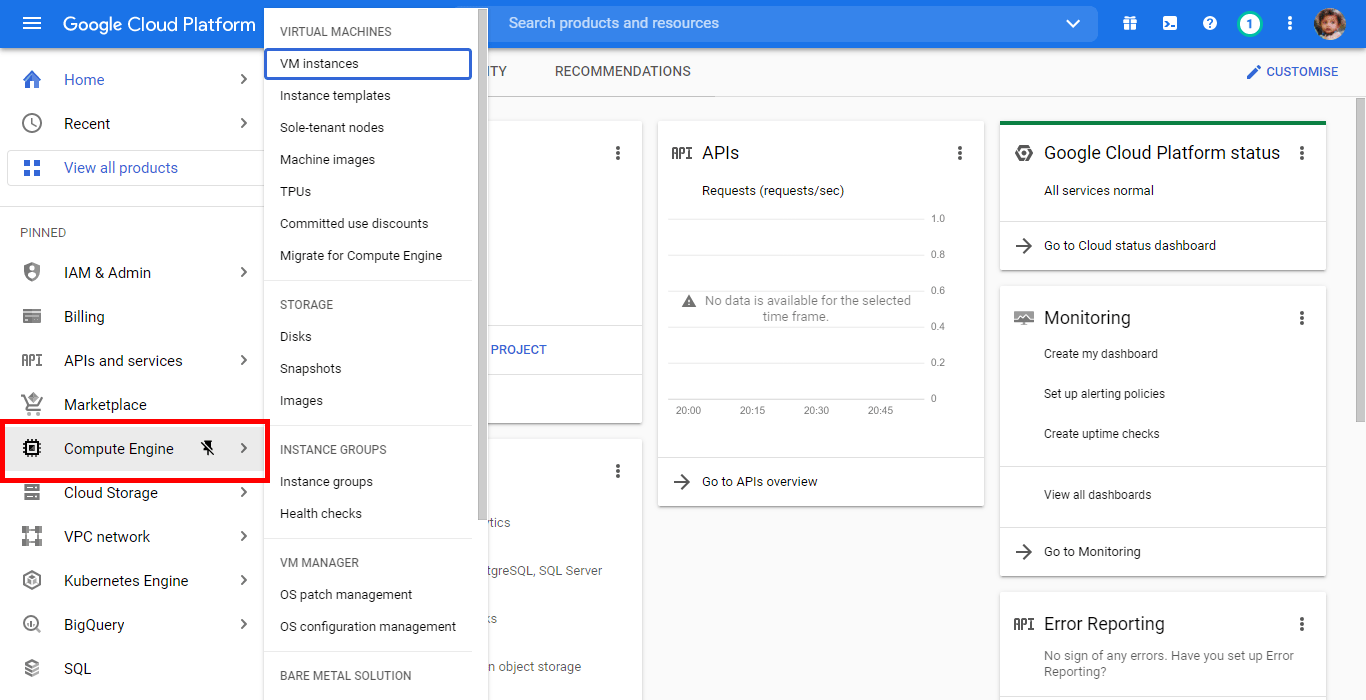
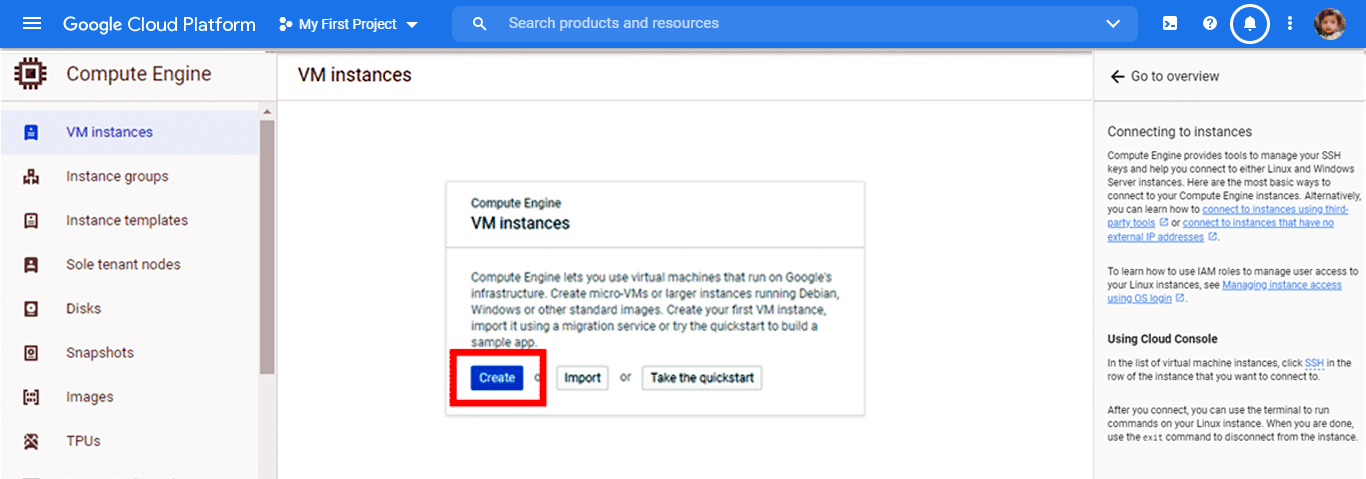
This will take you to the compute engine page, which contains a variety of options. Now, simply click on 'Create' to create the VM instance.
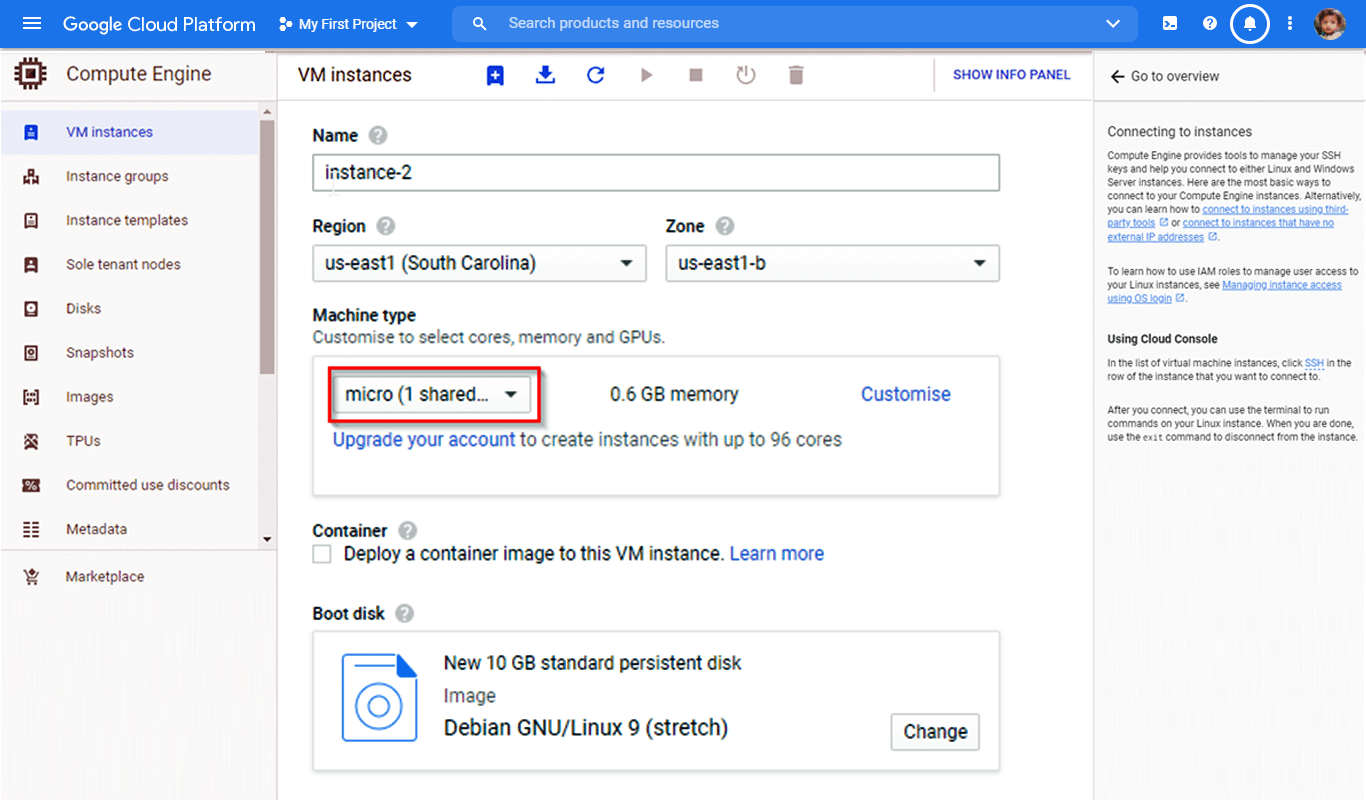
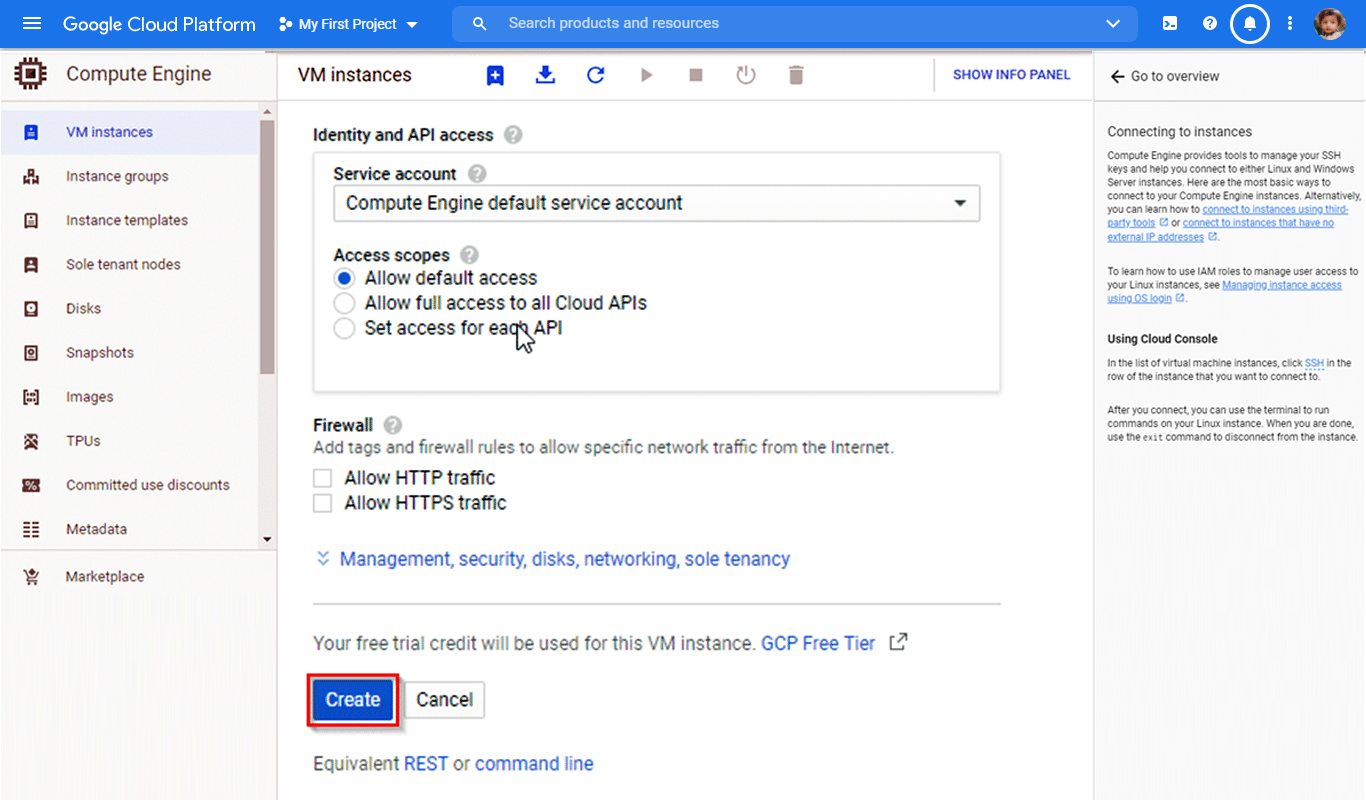
Step 7: You will now be presented with a page asking you to fill in a variety of details to initiate your instance Here, you can customise the instance specifications to suit your needs. For example, the cost may vary depending on the location and memory you choose to select. After filling in all the required details, click on the 'Create' button.
Voila! Now, your VM is ready to go.

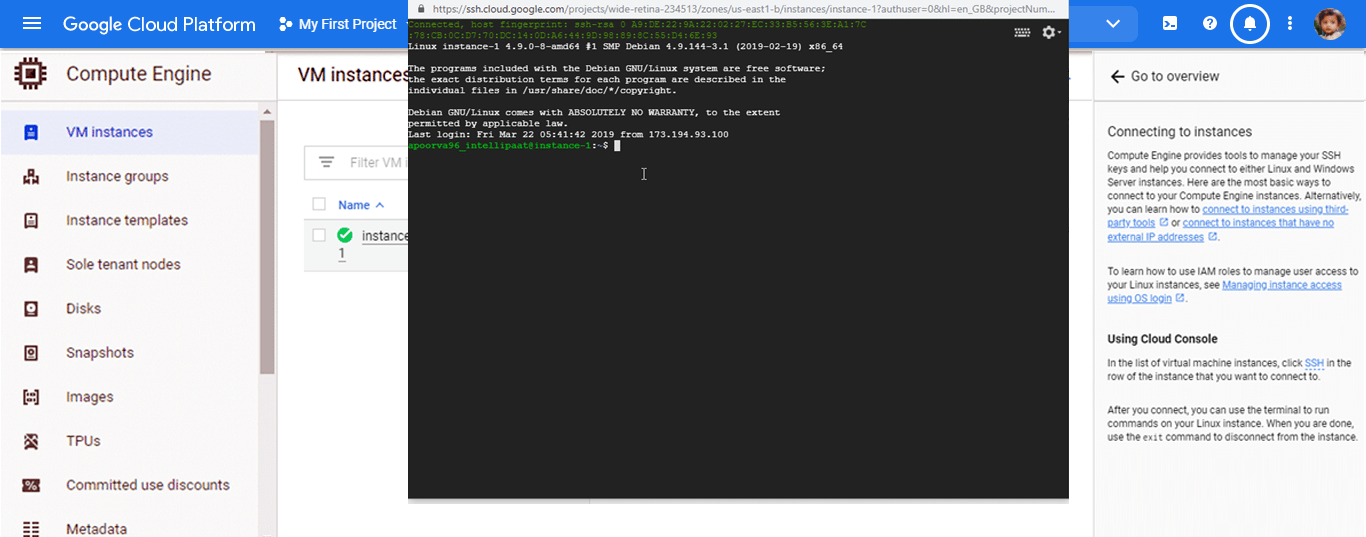
Step 8: The ‘Compute Engine’ page also provides a selection of tools to manage the SSH keys and aid connections to either Linux or Windows Server instances.
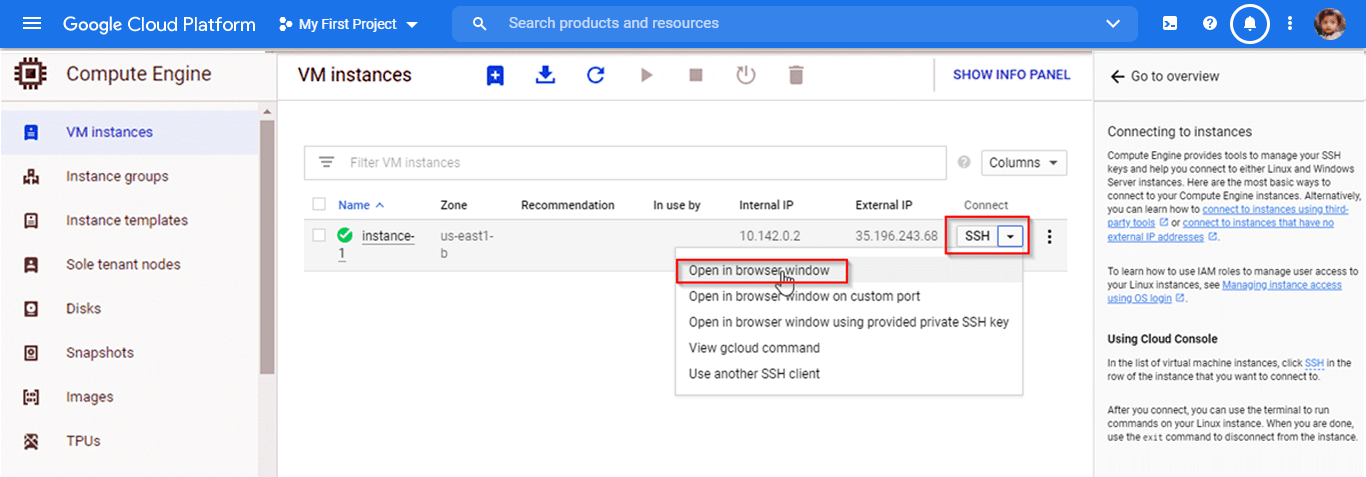
Click on the SSH, and select the 'Open in windows browser' option to ensure the CLI will run to your commands.
